
In our previous Zephyr blog, we looked at how to interface a simple IMU – Accelerometer sensor with Zephyr RTOS running on NRF52832. Knowing how to interface sensors over SPI protocol allows user to communicate with sensor’s register and get values for acceleration. We saw how we can create our own library for the sensor, in terms of simple header and C implementation file. This allowed us to hide functionality and separate the application code from the interfacing process, allowing user easy access to sensor’s functionality. This worked simply by declaring a single instance of the SPI bus and using the bus configurations hardcoded in the library file (LIS3DSH.c).
We can further leverage the power of Zephyr’s OS by adding driver support for your sensor. This allows user to not only use multiple instances of same sensors, but also provides a generic implementation of its functionality so that user can then decide on run-time which configuration of the bus to use (e.g., SPI’s instance, bus frequency, pins etc.) but also to use multiple instances of the same sensor under different bus configurations. Along with this, by writing drivers and interfacing them with Zephyr’s APIs we begin to develop standardized implementation for sensors that can easily be integrated in projects that have previously used similar Zephyr’s drivers and APIs.
In this article, we’ll see how we can add out-of-tree drivers in zephyr. Working in an “Out-of-Tree” (OOT) context means we will develop driver code independent of the central Zephyr repository, so no upstream changes are required. For Out-of-Tree driver development, Zephyr provides a generic example-application that can be cloned from their GitHub repository. This repo serves as a reference on how to structure Zephyr based applications.
Zephyr’s Device Driver Model
The Zephyr device model provides a consistent device model for configuring the drivers that are part of a system. The device model is responsible for initializing all the drivers configured into the system. In this model, the driver fills in the pointer to the structure containing the function pointers to its API functions during driver initialization. These structures are placed into the RAM section in initialization level order. These specific device Driver initialization APIs such as Device_Define() and Device_Declare() are intended to declare instances of device and not to be used in application side code.
The device initialization macros populate some data structures at build time which are split into read-only and runtime-mutable parts. More information about the Device driver model in Zephyr can be found in its documentation.
Similarly, the code we wrote in our last blog for the library had individual variables declared with a global scope. We therefore begin by encapsulating our code along with the data structures that contain the Device Data and Device Configuration settings. By encapsulating the data structures and code, it allows the drivers to instantiate itself at runtime via Device Driver Macro calls and allows data and configuration settings to act independently for each instance of sensor’s drivers.
Therefore in our code, we define data structure and configuration structure to hold pointers and variables that code the data for that instance of sensor.
struct lis3dsh_data {
uint8_t spi_tx_buf[SPI_BUFSIZE]; // SPI Tx buffer
uint8_t spi_rx_buf[SPI_INSTANCE]; // SPI Rx buffer
const struct device *bus;
int x,y,z; //values of acceleration in x,y & z
};
union lis3dsh_bus_cfg{
struct spi_dt_spec spi;
};
struct lis3dsh_config {
int (*bus_init)(const struct device *dev);
const union lis3dsh_bus_cfg bus_cfg;
};
We also encapsulate our implementation functions code by passing an argument of device type pointer and copying the data and config settings in each of the function from this device type pointer. This pointer is initialized at the run-time.
Functions for our driver implementation would then look like this:
static int get_acceleration( const struct device *dev){
struct lis3dsh_data *dta = dev->data;
const struct lis3dsh_config *cfg = dev->config;
//Further implementation
}
And similarly, we use instance-based Macros to initialize these device-tree structures that we have used. We define these macros at the end of our implementation file (lis3dh.c).
//Register a node in the deviceTree
#if DT_NUM_INST_STATUS_OKAY(DT_DRV_COMPAT) == 0
#warning “LIS3DSH driver enabled without any devices”
#endif
#define LIS3DSH_DEVICE_INIT(inst)
DEVICE_DT_INST_DEFINE (inst, lis3dsh_init, NULL, &lis3dsh_data_##inst, &lis3dsh_config_##inst, POST_KERNEL, CONFIG_SENSOR_INIT_PRIORITY, &lis3dsh_driver_api);
#define LIS3DSH_CONFIG_SPI(inst){
.bus_init = SPI_init,
.bus_cfg = { .spi = SPI_DT_SPEC_INST_GET(inst,
SPI_WORD_SET(8) | SPI_OP_MODE_MASTER | SPI_MODE_CPOL | SPI_MODE_CPHA, 0},
}
#define LIS3DSH_DEFINE_SPI(inst)
static struct lis3dsh_data lis3dsh_data_##inst;
static const struct lis3dsh_config lis3dsh_config_##inst = LIS3DSH_CONFIG_SPI(inst);
LIS3DSH_DEVICE_INIT(inst)
DT_INST_FOREACH_STATUS_OKAY(LIS3DSH_DEFINE_SPI)
Sensors API
To use the drivers and make them interact with our application code, we use Sensors APIs. In the zephyr/include/drivers directory, you can find all the API level code for every conceivable driver in Zephyr. In some cases, the API for your device may be there. In other cases, it may not be. The Sensors API in our case matches our needs. You can read up about the Sensors API on the official documentation site. When you use a higher-level API, you write static functions that match the API you’re working with. You pass the functions into an API structure. These APIs streamline the way your driver communicates with the application code.
For our drivers, we define a generic function that communicates with our sensor’s register to copy its values (accelerations in all 3-axis) to the driver’s data structure. We then define our logic in code so that by selecting different channels from the API call, we can return specific values corresponding to those channels, e.g. for SENSOR_CHAN_ACCEL_X we return acceleration value in x-axis . We then provide reference of these functions to our sensors API in the following way:
static const struct sensor_driver_api lis3dsh_driver_api = {
.channel_get = lis3dsh_channel_get,
.sample_fetch = get_acceleration
};
Configuration Structure
Knowing how to arrange your files in a way that it can be interpreted by Zephyr’s build system, is critical for drivers’ development. Each Kconfig and CMakeLists file should point to the next one in the hierarchy structure so that all files and DeviceTree bindings are linked together. The main files that describe drivers apart from the .c and .h files are the Kconfig, CMakeLists.txt and module.yaml files.
CMakeLists.txt is a Makefile of sorts that you use to add source files and include folders to a project. The neat thing about CMake is that it’s recursive and arranged in a hierarchy. This means a higher level CMakeLists.txt file spells out what, if anything, can be found in sub-directories. You make the changes you need closest to the code that’s affected. Kconfig allows you to create project-based configuration parameters. Like CMakeLists.txt, Kconfig files allow you to keep the configuration as close to your code.
In this example, only the innermost CMakelists.txt and Kconfig file pairs contain actual build or configuration instructions. Working from the innermost directories back to the example-application/ directory, these file pairs act as signposts, directing the build tools to find the innermost build and configuration instructions.
The second most important files for the driver’s configuration are the Device Tree bindings file (.YAML file) and the corresponding Overlay file. As discussed earlier, Zephyr’s hardware structure is based in the form of a Device Tree. Here Device tree bindings file is used to specify the format and meaning of the device tree data for a particular device or component. And a device tree overlay is a separate file that contains additional device tree data that can be “overlaid” on top of the main device tree at runtime. This allows for dynamic modification of the device tree nodes, such as adding or removing devices or changing pin assignments for device communication buses, without recompiling the entire device tree.
The sensor YAML file will declare properties that may or may not need to be initialized by the target-specific overlay file for correct driver operation. The properties declared within the YAML file will have a key called required, which may be true or false. If property: required: is false, then it does not need to be specified in the overlay file. If it is true, then it must be specified in the overlay file, or the project will not build.
Setting up the Drivers
There are three categorical topics to understand when adding and interacting with a driver. These are:
- Get the build system to find the driver
- Have the target-specific overlay file in place that aligns with the sensor yaml file
- Understand the Zephyr generalized sensor interaction functions
Getting the build system to find your driver and incorporate it involves one manifest file and a series of CMakeLists.txt and Kconfig files. We begin by cloning the example-application from the Zephyr-RTOS directory. You’ll find example-application inside the created my-workspace. Within my-workspace you’ll find your example-application, where you’ll find the necessary files that you’ll edit. Our file structure within the Example-Application is as follows.
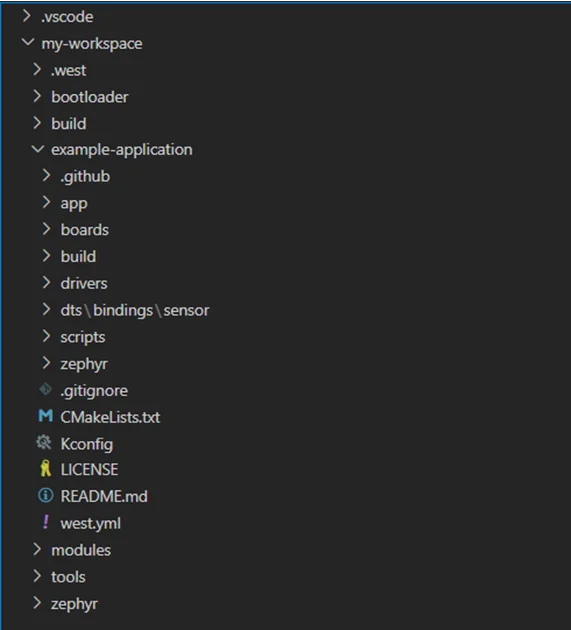
Looking into our Example-Application folder we’ll notice our own created folder inside the driver’s directory. We’ll see some changes made to the Kconfig and CMakeLists.txt file at every level of this hierarchy.
To change the required configuration files, Navigate to our Git-repository for LIS3DSH sensor drivers. Simply downloading this example-application and replacing this one with your own would unfortunately won’t work as build, and other setup folders need to be initialized by west init manually so they are correctly referenced from your zephyr’s sdk. Instead of replacing the whole folder, we’ll initialize the example-application as mentioned on the GitHub page of Zephyr-RTOS Example Application and after that we’ll create and modify the following files:
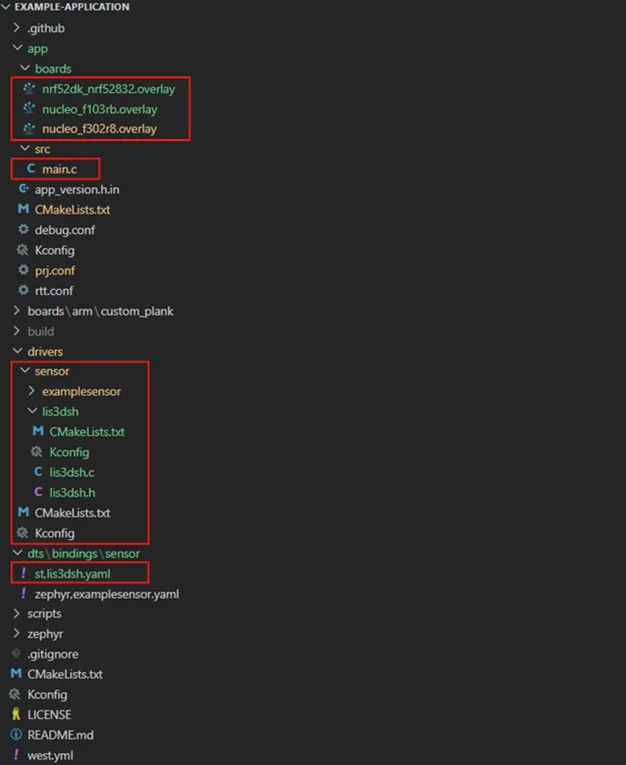
- Download the “drivers” folder from our GitHub repository. Copy and replace this folder inside “example-application/”
- Add the st,lis3dsh.yaml file from our GitHub repository to the dts/bindings/sensor directory in the example-application project
- Add the nrf52dk_nrf52832.overlay file to example-application/app/boards directory.
- Add samples/sensor/lis3dsh/prj.conf from our GitHub repository to example-application/app/
- Overwrite the main.c source code from our GitHub repository to the main.c file in the example-application/app/src folder.
That’s it for file addition. Our final directory structure should look like as shown below. The extra files that we created or modified are in red box.
Main Application Code
Using device Drivers means our sensor’s implementation lives inside the deviceTree and so the process of initializing the sensor would be similar to initializing a built-in zephyr peripheral like I2C/SPI bus or GPIO or LEDs.
const struct device *sensor = DEVICE_DT_GET(DT_INST(0,st_lis3dsh));
Since we’re using Sensors API to bridge the gap between DeviceTree implementation and User application code, we’ll simply declare a variables of sensor_value type which is understood by the Sensors API, and using it’s API calls to fetch a sample and extract the values of samples from the Sensor’s Data structures.
sensor_sample_fetch(sensor);
sensor_channel_get(sensor,SENSOR_CHAN_ACCEL_X,&acc_x);
sensor_channel_get(sensor,SENSOR_CHAN_ACCEL_Y ,&acc_y);
sensor_channel_get(sensor,SENSOR_CHAN_ACCEL_Z ,&acc_z);
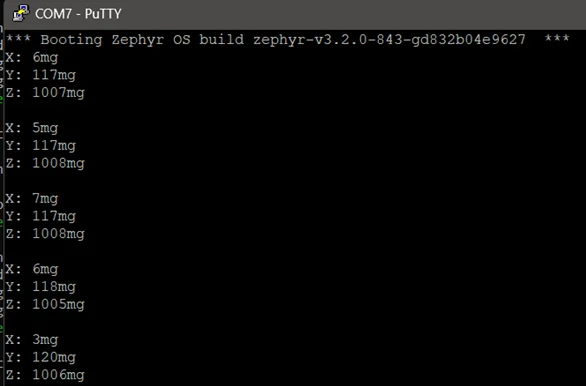
We can see our output on a COMM port as follows:
For more information on how to write drivers for your sensors within the zephyr ecosystem, feel free to reach out to the Oxeltech.
Links to our Resources:
- Blog Post on interfacing LIS3DSH with Zephyr
- GIT repository for driver implementation of LIS3DSH
References:
- https://zephyrproject.org/
- https://docs.zephyrproject.org/3.1.0/kernel/drivers/index.html
- https://docs.zephyrproject.org/3.0.0/reference/peripherals/sensor.html
- https://github.com/zephyrproject-rtos/example-application
- https://github.com/zephyrproject-rtos/zephyr
- https://interrupt.memfault.com/blog/building-drivers-on-zephyr
- https://blog.golioth.io/adding-an-out-of-tree-sensor-driver-to-zephyr/